3 Ingredient Fudge – Easy, Creamy, and Foolproof

If you’ve ever craved homemade fudge but didn’t want the fuss, this recipe is your new go-to.
It’s rich, smooth, and comes together in minutes with just three pantry staples. No candy thermometer, no long simmering, no guesswork.
You can make it for last-minute gatherings, gifting, or a sweet weeknight treat. It’s simple enough for beginners, yet good enough to impress anyone who takes a bite.

3 Ingredient Fudge – Easy, Creamy, and Foolproof
Ingredients
- Chocolate chips (12 ounces/340 g) – semi-sweet or dark for classic flavor
- Sweetened condensed milk (14-ounce/396 g can)
- Unsalted butter (2 tablespoons)
- Optional add-ins (choose 1–2): vanilla extract, flaky sea salt, chopped nuts, mini marshmallows, crushed candy canes, peanut butter, or espresso powder
Instructions
- Prep the pan. Line an 8-inch square baking pan with parchment paper, leaving overhang on two sides for easy lifting. Lightly mist with nonstick spray if you like.
- Combine the base. In a medium, heavy-bottomed saucepan, add the chocolate chips, sweetened condensed milk, and butter.
- Gently melt. Set the pan over low heat. Stir slowly and constantly with a heatproof spatula until the chocolate is almost fully melted and the mixture looks smooth and glossy. Remove from heat while a few small bits remain; they’ll melt off-heat.
- Flavor it. If using add-ins like vanilla (1 teaspoon) or a pinch of salt, stir them in now. Fold in any mix-ins (nuts, marshmallows, etc.) quickly so they don’t melt away.
- Spread and smooth. Scrape the mixture into the lined pan. Use the spatula to level the top. For a clean finish, tap the pan firmly on the counter a couple of times to release air bubbles.
- Chill to set. Refrigerate for 2–3 hours, or until firm enough to slice cleanly. For best texture, don’t rush this step.
- Slice and serve. Lift the fudge out using the parchment. Warm a sharp knife under hot water, wipe dry, then cut into 1-inch squares. Warming the knife gives super clean edges.
Why This Recipe Works
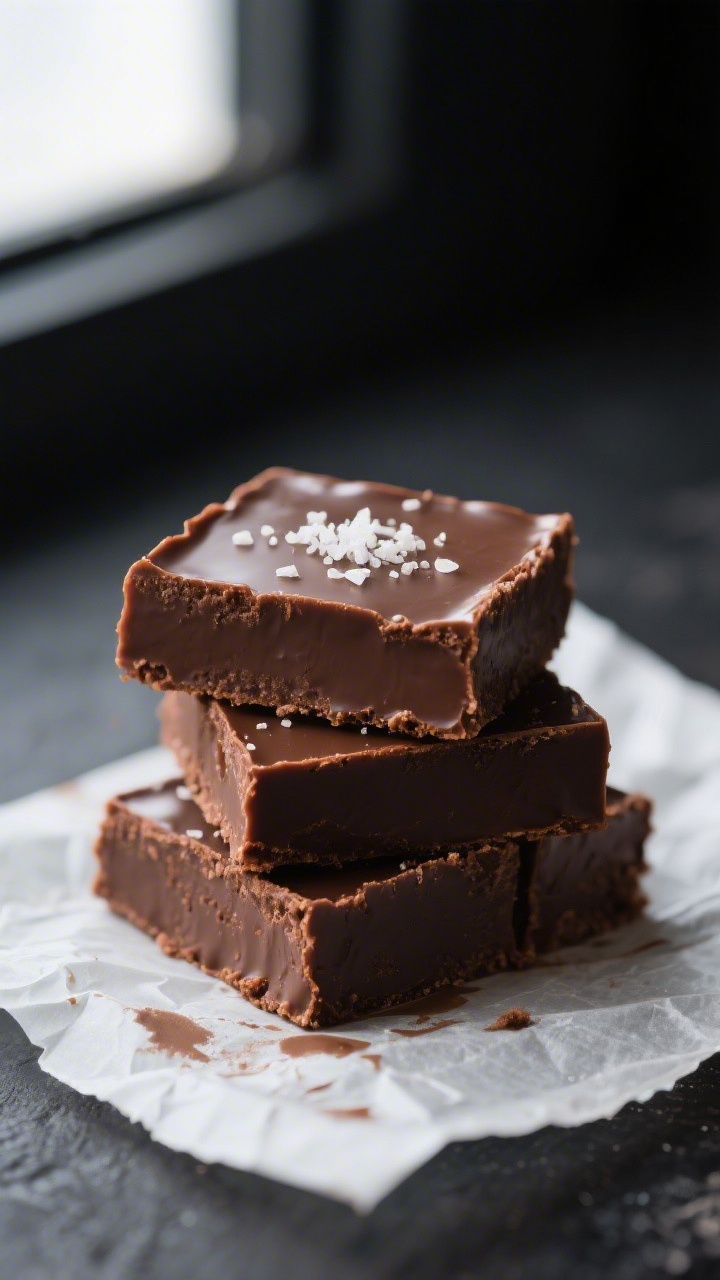
This fudge uses a smart shortcut: sweetened condensed milk. It provides sweetness and a silky texture without needing precise sugar stages.
Then, chocolate chips give it structure and that classic fudgy bite, while a bit of butter rounds out the flavor and helps it set with a velvety finish.
Together, these three ingredients melt into a glossy mixture that firms up beautifully in the fridge.
There’s no boiling to a “soft ball stage,” no worry about graininess, and no need for special tools.
It’s consistently creamy every time, even if you’ve never made candy before.
Shopping List
- Chocolate chips (12 ounces/340 g) – semi-sweet or dark for classic flavor
- Sweetened condensed milk (14-ounce/396 g can)
- Unsalted butter (2 tablespoons)
- Optional add-ins (choose 1–2): vanilla extract, flaky sea salt, chopped nuts, mini marshmallows, crushed candy canes, peanut butter, or espresso powder
Instructions

- Prep the pan. Line an 8-inch square baking pan with parchment paper, leaving overhang on two sides for easy lifting. Lightly mist with nonstick spray if you like.
- Combine the base. In a medium, heavy-bottomed saucepan, add the chocolate chips, sweetened condensed milk, and butter.
- Gently melt. Set the pan over low heat. Stir slowly and constantly with a heatproof spatula until the chocolate is almost fully melted and the mixture looks smooth and glossy.
Remove from heat while a few small bits remain; they’ll melt off-heat.
- Flavor it. If using add-ins like vanilla (1 teaspoon) or a pinch of salt, stir them in now. Fold in any mix-ins (nuts, marshmallows, etc.) quickly so they don’t melt away.
- Spread and smooth. Scrape the mixture into the lined pan. Use the spatula to level the top.
For a clean finish, tap the pan firmly on the counter a couple of times to release air bubbles.
- Chill to set. Refrigerate for 2–3 hours, or until firm enough to slice cleanly. For best texture, don’t rush this step.
- Slice and serve. Lift the fudge out using the parchment. Warm a sharp knife under hot water, wipe dry, then cut into 1-inch squares.
Warming the knife gives super clean edges.
Keeping It Fresh
Fudge keeps best when it’s cool, dry, and sealed. Store squares in an airtight container with parchment between layers to prevent sticking.
At room temperature, it stays fresh for 3–4 days if your kitchen is cool.
In warmer weather, keep it in the fridge for up to 2 weeks. For longer storage, freeze fudge for up to 2 months.
Wrap the slab tightly in parchment and then in plastic or a freezer bag.
Thaw in the fridge overnight before slicing for the best texture.

Why This is Good for You
This isn’t health food, but there are a few upsides worth noting. Because it’s so rich, a small piece is satisfying, which can help with portion control.
Using dark chocolate increases cocoa solids, which bring antioxidants and a deeper, less sweet flavor.
It’s also a reliable treat for sharing and gifting, which can cut down on impulse bakery runs.
And the short ingredient list lets you choose higher-quality chocolate or even dairy-free options if that suits your needs.
What Not to Do
- Don’t crank the heat. High heat can scorch chocolate and turn your fudge grainy. Low and slow is the way.
- Don’t use evaporated milk. It’s not the same as sweetened condensed milk.
You’ll end up with a thin, soft mixture that won’t set right.
- Don’t skip the parchment. Fudge sticks, and prying it out ruins those neat edges.
- Don’t over-stir once smooth. Excessive stirring can introduce air bubbles and dull the sheen.
- Don’t slice too soon. Warm fudge won’t cut cleanly and can lose its shape. Let it chill fully.
Recipe Variations
- Salted Dark Chocolate Fudge: Use dark chocolate chips and finish with flaky sea salt on top before chilling.
- Peanut Butter Swirl: Microwave 1/3 cup peanut butter until pourable. Dollop over the spread fudge and swirl with a knife.
Chill as usual.
- Rocky Road: Fold in 1 cup mini marshmallows and 1/2 cup chopped roasted almonds right before spreading in the pan.
- Peppermint Crunch: Add 1/2 teaspoon peppermint extract and sprinkle crushed candy canes on top. Great for holidays.
- Mocha Fudge: Stir in 1 teaspoon instant espresso powder and 1 teaspoon vanilla for a coffee-kissed twist.
- Cookies and Cream: Use white chocolate chips and fold in 1 cup crushed chocolate sandwich cookies.
- Nutty Maple: Add 1 teaspoon maple extract and 3/4 cup toasted pecans for a cozy flavor.
- Dairy-Free: Use dairy-free chocolate chips and sweetened condensed coconut milk. Swap butter for coconut oil (1 tablespoon) for a clean set.
FAQ
Can I make this in the microwave?
Yes.
Combine the chocolate chips, sweetened condensed milk, and butter in a microwave-safe bowl. Heat in 20–30 second bursts at 50–70% power, stirring well between each round, until mostly melted and smooth. Finish stirring off-heat.
Why is my fudge not setting?
Most often, the issue is using evaporated milk instead of sweetened condensed milk, or measuring loosely.
Another culprit is excess heat, which can separate the mixture. Make sure you chill it long enough and use the correct ingredients and ratios.
How do I keep it from getting grainy?
Melt over low heat and stop stirring once the mixture is glossy and smooth. Avoid overheating and don’t add cold liquids after melting, which can cause seizing.
Can I double the recipe?
Absolutely.
Use a 9×13-inch pan and melt the mixture in a larger, heavy pot to keep it from scorching. The chill time may increase by 30–60 minutes.
What chocolate works best?
Semi-sweet is the most balanced. Dark chocolate makes it richer and less sweet.
Milk chocolate will be sweeter and slightly softer; if using milk chocolate, add an extra 2–3 ounces of chips to help it set.
Can I add extract flavors?
Yes. Stir in 1 teaspoon of vanilla, peppermint, almond, or orange extract after removing the mixture from the heat. Start small; extracts are potent.
How do I get super clean edges?
Chill fully, then use a long, sharp knife warmed under hot water and wiped dry.
Make straight down cuts instead of sawing motions, wiping the blade between cuts.
Is this safe to ship as a gift?
Usually, yes. Pack in a snug container with parchment between layers and include a cold pack in warmer months. Aim for 2–3 day shipping to keep texture ideal.
Can I reduce the sweetness?
Use dark chocolate (60–70% cacao) and add a pinch of salt.
You can also mix half dark and half semi-sweet for balance.
What pan size can I use if I don’t have 8-inch?
A 9-inch square pan will give slightly thinner pieces and set a bit faster. A loaf pan works for a small batch; just keep the thickness consistent for even setting.
Final Thoughts
Three ingredients, one pan, and a chill in the fridge—that’s all it takes to make fudge that tastes like you spent hours. It’s reliable, adaptable, and a true crowd-pleaser.
Keep the basics on hand and you can whip up a batch anytime. Once you try this, you might never go back to store-bought again.
Printable Recipe Card
Want just the essential recipe details without scrolling through the article? Get our printable recipe card with just the ingredients and instructions.