3 Ingredient Ice Cream Sandwiches – Easy, Fun, and Delicious

Warm day or not, a homemade ice cream sandwich always hits the spot. This version keeps it unbelievably simple with just three ingredients and minimal fuss.
No fancy equipment, no complicated steps—just a sweet treat you can whip up in minutes.
Kids love helping with these, and adults appreciate how customizable they are. You’ll get a dessert that feels nostalgic, looks impressive, and tastes like summer.

3 Ingredient Ice Cream Sandwiches
Ingredients
- Ice cream: About 1 to 1.5 quarts (vanilla is classic, but any flavor works).
- Cookies: 24 large, sturdy cookies (think chocolate chip, oatmeal, or chocolate wafers).
- Coating (optional but counts as the third ingredient if you use plain cookies and ice cream): Mini chocolate chips, sprinkles, or crushed nuts.
Instructions
- Soften the ice cream: Let it sit at room temperature for 10–15 minutes until scoopable but not soupy. This makes spreading easier and prevents cookie breakage.
- Line a tray: Place a sheet of parchment on a baking sheet. Arrange half the cookies face down to prep for assembly.
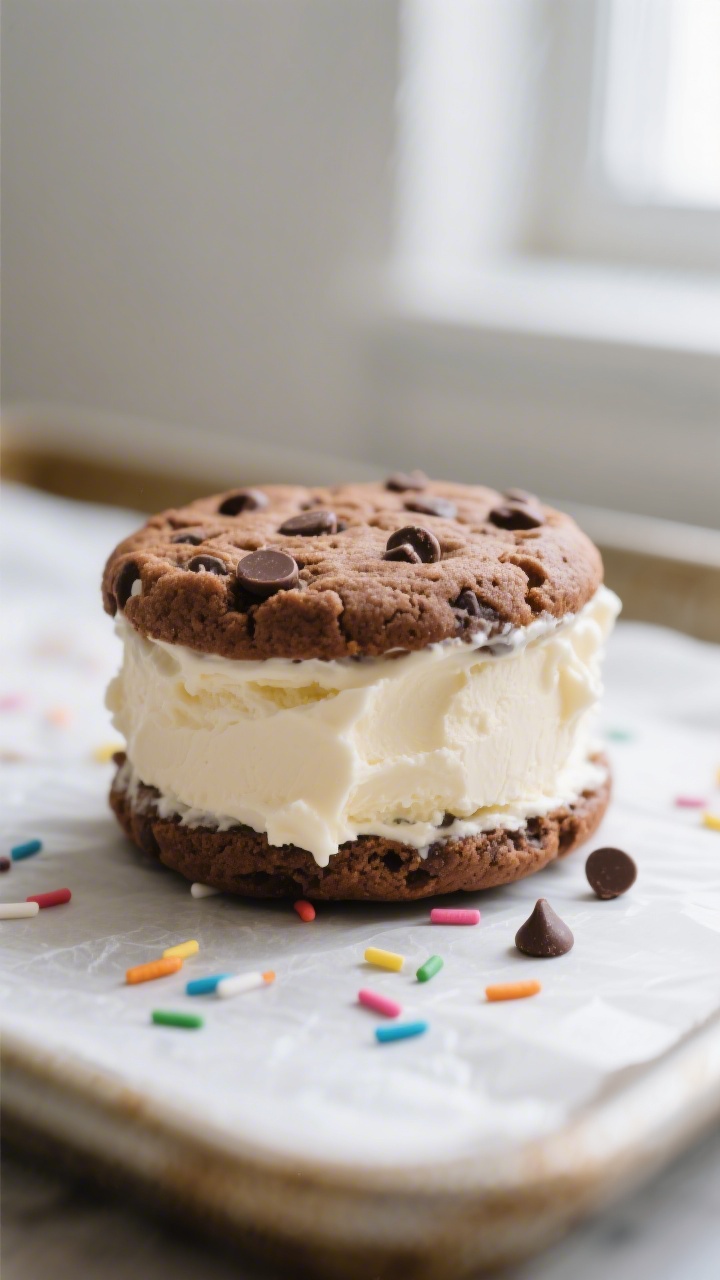
- Scoop and spread: Add a generous scoop (about 1/3 cup) of ice cream to each bottom cookie. Use the back of a spoon to spread it to the edges.
- Top and press: Place a second cookie on top. Gently press to level the ice cream. Aim for about 3/4 to 1 inch thick.
- Roll the edges (optional): Pour your coating into a shallow bowl. Roll the edges of the sandwich to coat the ice cream rim.
- Freeze to set: Transfer sandwiches to the lined tray and freeze for 1–2 hours, or until firm enough to handle without squishing.
- Wrap for storage: Once set, wrap each sandwich tightly in plastic wrap or parchment and return to the freezer.
What Makes This Recipe So Good
- Only three ingredients: Budget-friendly and pantry-ready. No stabilizers or hard-to-find items.
- Quick assembly: The hands-on time is short, and most of the magic happens in the freezer.
- Endlessly customizable: Switch the cookies, swap the ice cream flavor, and add optional coatings.
- No special tools needed: A spoon and a baking sheet are enough.
- Make-ahead friendly: Perfect for parties or busy weeks—store and serve when you want.
Ingredients
- Ice cream: About 1 to 1.5 quarts (vanilla is classic, but any flavor works).
- Cookies: 24 large, sturdy cookies (think chocolate chip, oatmeal, or chocolate wafers).
- Coating (optional but counts as the third ingredient if you use plain cookies and ice cream): Mini chocolate chips, sprinkles, or crushed nuts.
If you’d rather keep it ultra-simple, your three ingredients can be ice cream, cookies, and a quick coating.
If you want to count it differently, use ice cream sandwiches with just cookies and ice cream and skip the garnish. Either way, you’re set.
How to Make It

- Soften the ice cream: Let it sit at room temperature for 10–15 minutes until scoopable but not soupy. This makes spreading easier and prevents cookie breakage.
- Line a tray: Place a sheet of parchment on a baking sheet. Arrange half the cookies face down to prep for assembly.
- Scoop and spread: Add a generous scoop (about 1/3 cup) of ice cream to each bottom cookie. Use the back of a spoon to spread it to the edges.
- Top and press: Place a second cookie on top. Gently press to level the ice cream.
Aim for about 3/4 to 1 inch thick.
- Roll the edges (optional): Pour your coating into a shallow bowl. Roll the edges of the sandwich to coat the ice cream rim.
- Freeze to set: Transfer sandwiches to the lined tray and freeze for 1–2 hours, or until firm enough to handle without squishing.
- Wrap for storage: Once set, wrap each sandwich tightly in plastic wrap or parchment and return to the freezer.
How to Store
- Short term: Keep in a sealed container or wrapped individually for up to 1 week for best texture and flavor.
- Longer storage: Up to 1 month if tightly wrapped and placed in a freezer-safe bag. Press out excess air to avoid freezer burn.
- Serving tip: Let sit at room temperature for 3–5 minutes before eating for just-soft-enough cookies and creamy ice cream.

Health Benefits
These are treats, not health food, but you can make a few smart choices.
Choose lower added sugar or light ice cream to reduce calories, or use Greek yogurt-based frozen desserts for extra protein. Whole-grain or nut-based cookies add a bit more fiber and healthy fats.
Portion control helps too. Smaller cookies create a more modest serving while still feeling indulgent.
If you’re sensitive to dairy or gluten, use dairy-free ice cream and gluten-free cookies for a dessert that still satisfies.
What Not to Do
- Don’t use warm cookies: The ice cream will melt instantly and slide off.
- Don’t skip the quick freeze: If you serve right away, the filling won’t hold and the sandwich will collapse.
- Don’t choose crumbly cookies: Thin, fragile cookies will break under pressure. Go for sturdy, slightly chewy options.
- Don’t over-soften the ice cream: If it’s runny, it won’t set cleanly and will cause ice crystals later.
- Don’t stack unwrapped: Stacking without wrapping leads to sticking and freezer burn.
Recipe Variations
- Classic chipwich: Chocolate chip cookies + vanilla ice cream + mini chocolate chips on the edges.
- Cookies and cream: Chocolate wafer cookies + cookies-and-cream ice cream.
- Peanut butter crunch: Peanut butter cookies + chocolate ice cream + crushed peanuts.
- Mint chocolate: Chocolate cookies + mint chip ice cream + dark chocolate shavings.
- Strawberries and shortcake: Shortbread cookies + strawberry ice cream + freeze-dried strawberry crumbs.
- Breakfast twist: Oatmeal cookies + coffee ice cream + cocoa nibs.
- Dairy-free delight: Almond milk or coconut milk ice cream + gluten-free cookies + toasted coconut.
- Mini sliders: Use small cookies for bite-size treats—great for parties and kids.
FAQ
How do I keep the cookies from getting too hard in the freezer?
Use cookies that are slightly soft to begin with. Let the sandwiches sit at room temperature for a few minutes before eating.
Chewy cookies hold up better than brittle ones.
What’s the best ice cream to use?
Choose a high-quality ice cream that’s creamy but not too airy. Mid-range brands melt and refreeze more predictably. Avoid ice creams with lots of mix-ins if your cookies are delicate, as big chunks make spreading harder.
Can I make these gluten-free or dairy-free?
Yes.
Use gluten-free cookies and dairy-free ice cream made from almond, oat, or coconut milk. Check labels for potential cross-contamination if you’re sensitive.
How do I prevent freezer burn?
Wrap each sandwich tightly in plastic wrap or parchment, then place in a zip-top freezer bag and squeeze out excess air. Store toward the back of the freezer where temperatures are most stable.
Can I assemble them ahead for a party?
Absolutely.
Make them up to a week in advance. Keep them wrapped, then set out for 5 minutes before serving so they’re easy to bite.
What if my ice cream is too hard to spread?
Let it sit at room temperature for a few minutes, or transfer it to a bowl and stir to soften evenly. Avoid microwaving, which can create melted pockets that refreeze icy.
Do I need to bake my own cookies?
No.
Store-bought cookies work great and save time. If baking, aim for cookies that are slightly soft in the center and fully cooled before assembly.
How thick should the ice cream layer be?
Aim for 3/4 to 1 inch thick. Thicker layers look impressive but take longer to set.
Consistency matters more than exact measurements.
Final Thoughts
3 ingredient ice cream sandwiches are the kind of dessert that makes everyone smile with almost no effort.
Keep a batch in the freezer and you’re always a few minutes away from a treat that feels special. Choose flavors you love, mix up the coatings, and have fun with it.
Simple, sweet, and totally satisfying—just the way a summer classic should be.
Printable Recipe Card
Want just the essential recipe details without scrolling through the article? Get our printable recipe card with just the ingredients and instructions.